Saturday, October 28, 2006

Round 3 Submission

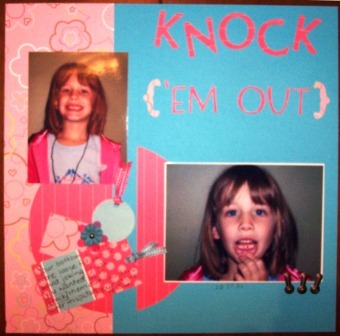
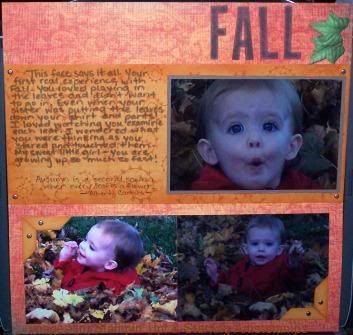
Well, this is my Rd 3 submission for the Design Team. The picture is actually terrible. It looks washed out, so I am going to try to take another picture tomorrow and see if it turns out any better. I wanted to get it posted though just in case I can't get to it tomorrow. This is of Madison when she lost her 1st tooth - 10/17/06. Two days after I took this picture she lost her 2nd tooth - both on the bottom next to each other. Of course, she didn't even know she lost her 2nd tooth until I told her. She was playing with her friends and eating popcorn - somewhere along the way it came out. :)

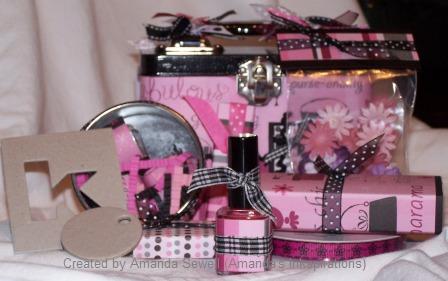
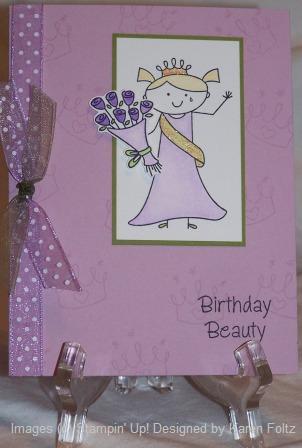
Well, it is now 3am for me and I really need to hit the bed! My kids will be up nice and early for me, so I am going to get 4 hours at best tonight. I wanted to get this on my blog though because I was excited to finish it! Of course, if you could only see it IRL - it is so much better. Oh well!

Friday, October 27, 2006

Stamp Club Projects

This was my favorite of all the projects we did at my stamp club. I was reading some blogs and saw this card on JanTink's (Janine Tinklenberg) blog. I LOVED it and knew I had to do it with my stamp club. I changed it just a slight bit to what I had on hand. First, I took a piece of scrap paper and tore it to create the mask. Then I took a sponge and Craft White ink and sponged over the mask to create the white faux tearing. Then using the Craft White again - stamped the pine needles (again keeping the mask in place). I took the 'berries' and stamped them over top with Buckaroo Blue (keeping the mask in place). The Itty Bitty background stamp set was used on the edges with Buckaroo Blue ink. I sponged around the edges of the card base with Whisper White. The ribbon and greeting finished the card off. Thanks Janine for this beautiful card idea - it was a hit with my club!

Supplies:
Stamps:Peaceful Wishes, Itty Bitty Backgrounds
CS:Buckaroo Blue
Ink:Craft White, Buckaroo Blue
Other:Stamping Sponge, Wide White Organdy Ribbon, Narrow Navy Organdy Ribbon

This is the 2nd card we did at my Stamp Club. I love this cute little Snowflake set! It would go perfect with our Little Pieces set too. The white panel was sponged on the edges with Cranberry Crisp ink. The Handsome Hunter panel was distressed on the edges using the Cutter Kit Distresser. I stamped the greeting twice on whisper white cs - once in Cran. Crisp and once in Hand. Hunter. Then punched the Hand. Hunter one out with the 1 1/4" Circle Punch. This was then adhered to a circle punch out of Handsome Hunter using the 1 3/8" Circle Punch. With the Cran. Crisp greeting, I used the 1/2" Circle Punch and punched out the middle only (Love, Peace, Joy). This was then placed on top of the Handsome Hunter with a Stampin' Dimensional.

Supplies:
Stamps:Snow Flurries (SU! Holiday Mini), Circle of Friendship
CS:Cranberry Crisp, Handsome Hunter, Whisper White
Ink:Cranberry Crisp, Handsome Hunter (2nd Generation stamping on the white panel too)
Other:Hunter Grosgrain Ribbon, 1/2" Circle Punch, 1 1/4" Circle Punch, 1 3/8" Circle Punch, Stampin' Dimensional, Cutter Kit (Edge Distresser), Stamping Sponge


This is the 3rd card we did at my Stamp Club this past Monday. I got the color selection from the Color Coach. My main color is the Glorious Green and I used the colors suggested from the wheel as coordinating - Rose Red and Summer Sun. I wanted a bright fun card!

Supplies:
Stamps: Think Big (SU! Holiday Mini)
CS:Whisper White, Glorious Green, Summer Sun
Ink:Glorious Green, Summer Sun, Rose Red
Other:Mat Pack, Silver Brads, Stamping Sponge (Sponged around the edges of the card base with Glorious Green)

Thursday, October 26, 2006


Round 3

Well - I made it to rd 3 of the Design Team call. Our next challenge is to use the word 'knock' in our title. Still thinking of what pictures to use for this one. I have an idea, but don't think I have the pictures for it. So, we'll see....I plan to work on it tomorrow though. I have a workshop on Sunday that I also need to prepare for, so I want to get my layout done and submitted on time.

Here's an Inky Antics girl card I made recently for a color challenge.

Supplies:
Stamps:Coffee Girl, Retro Background (Inky Antics)
CS: Close to Cocoa, Cranberry Crisp, VV
Ink:Basic Black, Cranberry Crisp, Chocolate Chip
Other:Ribbon, Stampin' Dimensionals, Stamping Sponge, Cutter Kit - Distresser (SU), Prismacolor Pencils, Sakure Glitter Gel Pen

Sunday, October 22, 2006

DT - Week 2


Ok - so this is the layout I submitted for the Week 2 challenge for the DT. Our challenge was to use 1 Manufacturer. As well as, only 1 of each item used. Only 1 word for our title. It seems easier than it actually was though. Like - ribbon could only be used in one place...you couldn't cut it and use it in 2 spots. So, I chose Basic Grey Oh! Baby Boy for my line. I love BG and that was what I had the most of. I did go out and look about buying some things, but decided that I have way more than enough to do a layout right here!! :)

So, the voting has begun. This time we had to vote for 2 people. In total - 10 people will be voted off come Monday. I'm telling you - the suspense is enough to give a person an ulcer!!

Our hints for Week 3 have begun. The first hint was a picture of the Earth. She is giving us another hint in the morning. Then the actual challenge is announced Monday - after all voting has taken place.

I really had fun making this layout. I put a Basic Grey Wholly Cow Rub-on in the upper right corner of the picture. I thought it looked best there. I also did doodling in 2 of the 4 corners with my White Uni-Gel Pen. I printed Trenton's name on the computer. When I printed it out, I printed it in reverse. Then adhered it to the blue Bazzill card stock. Then cut it out. I really like how this looks - my first time trying this! I had tried to print directly on the card stock, but I think the 'weight' was too heavy because the printer kept kicking it back out to me. So, I went with this option and am so glad I did. This is the first page in Trenton's book. I did the girls first page layout the same way - their hospital photo and name.

Wednesday, October 18, 2006

Coaster Ornaments

I had so much fun making these. I needed to make a baby gift item for a swap I am in. Well, I decided to make these for the swap. This is the front and back. These are covered coasters. The front is where you put the baby's picture (in this case) and the back is for the 'statistics'. Then you can use these to hang on a Christmas tree, hang in the baby's bedroom, hang in your office, wherever!

I loved how these turned out!! I am seriously thinking of doing a class on these. It would be so much fun!!

Tuesday, October 17, 2006


be merry

I made this for a swap I'm in. I used Whipper Snapper Designs (the tree and sentiment - both by Anna Wight). Again - I love her designs and style! I really need to get started on my Christmas cards as well - this may be one of them. For those of you who know me though - I don't like to mass produce, so if I use this...it will only be for about 5 or 10 total. I then move on to another design. :)

Supplies:
Stamps:Whipper Snapper Designs (Anna Wight)
CS:Whisper White, Cranberry Crisp, Old Olive, Holiday Designer Series Paper (all SU!)
Ink: Basic Black (SU!)
Other:Prismacolor Pencils, Sakura Glitter Gel Pen, Sakura Red Glaze Pen, Ticket Corner Punch (SU!), Olive Brads (SU!), Stampin' Dimensionals (SU!)
Round 2

Well - I've made it to round 2 for the DT Call!! The next challenge is a somewhat difficult one (or more like I'm making it more difficult than needed). Our challenge - to use 1 Manufacturer's products for our page. That would be easy, except you have to limit everything you use to 1 - so, 1 brad, 1 ribbon, 1 pp, 1 cardstock, etc. Again - it all has to come from the same manufacturer, so if they don't make brads, well then you can't use it. So, I think I have the manufacturer I'm going to use. Just need to check my stash and see if I have what I need to make a decent layout! The competition is down to 51 of us!!! I swear my stomach was in knots waiting for the results of the first round. I know I will go through this each round that I get to compete in!

When I'm finished - I'll post my layout (this is the only place we can post our work - besides the actual site that is).

Sunday, October 15, 2006


Here is a layout I created for a Design Team tryout. I'm up against a lot of other great stampers, so not sure how far I'll make it. They are doing the tryouts somewhat like Survivor - all participants will vote others off. They are granting 5 immunities this first round.

The challenge for this round was to create a layout based on a particular AD. The AD was in black/white with the only color on it being Orange. So, our layout had to be inspired by the AD and we HAD to use the color orange somewhere on our layout. So, this was my take on the AD that was posted. We have until midnight CST to post layouts. Mine is already posted....now the waiting begins!! UGH!! Hmm...maybe that is why I don't feel the greatest today - my nerves must be getting to me!!!

Whether I go on or get voted off - I'm going to follow it along to see the participants that make it. The site is Scrap Love (www.scraplove.com). So, if you don't mind - wish me luck!!!

Friday, October 13, 2006


I made this card for a challenge on a group I belong to. The challenge was to use Chipboard on the card. The chipboard is the square piece with the circles. I covered it using SU! Designer Series Paper. I then stamped the images in Pixie Pink and Certainly Celery on Whisper White cardstock. Placed it behind the chipboard. I sanded the edges of the chipboard. I threaded Olive ribbon around the card (made a slit on the fold to thread ribbon through). Used a piece of Hodgepodge Hardware. To tie in the pink some more I added a small piece of Pink ribbon (retired from SU!). The greeting was stamped in Old Olive. I also then sponged the base card on all sides with Old Olive ink.

I really like how this card turned out. I LOVE green, so really anything with green is great! :) I like the pink/green combo here too (which was obviously inspired by the DS Paper).

I hope the person that gets this likes it as well. I'm late sending it to her, but hope it was worth the wait.

Supplies
Stamp Set - Wild About You
CS - Certainly Celery, WW, Designer Series Paper (don't remember the name offhand)
Ink - Pixie Pink, Certainly Celery, Old Olive
Other - Chipboard, Olive Narrow Organdy Ribbon, Pink Wide Organdy Ribbon (retired), Hodgepodge Hardware, Stamping Sponge, Glue Dots (to hold the hardware in place)

Tuesday, October 10, 2006


THANK YOU AMANDA!!

This was my gift from Amanda for winning on her blog. WOW!! For some reason I can't get the actual tin picture to show up, so this is the only one I can post. There were so many goodies jam-packed into the tin. I got Prima flowers, too cool pink ribbon w/black flowers, white ribbon w/black polka dots, purple brads, chipboard, gum, tissues, pink nail polish (used it right away!), nuggets - all coordinated so well!! I am still shocked and keep looking over my goodies with amazement that she sent this to ME!!!! I am so stinkin' happy that is now in my possession. :) THANK YOU!! THANK YOU!! THANK YOU AMANDA!! If you haven't checked out Amanda's blog yet - be sure to pop over there to see her fantabulous works of art! (http://inkspirations.blogspot.com/).

Monday, October 09, 2006


Happiness is Sunflowers

This is the 3rd card from my Sept. stamp club. This card idea was CASEd from another great stamper on SCS (sorry can't remember who right now).

Supplies:
Stamps - Serene Sunflower, Warm Words, Linen
CS - True Thyme, So Saffron, VV
Ink - True Thyme, So Saffron, Creamy Caramel, Basic Black
Other - Designer Label Tug Punch, Sponging


Happy Harvest

This is another card my stamp club made in Sept.

Supplies:
Stamps - Loads of Love, Loads of Love Accessories, Itty Bitty Backgrounds
CS - Going Grey, Brocade Blue, Pumpkin Pie, WW
Ink - Basic Black, Going Grey, Brocade Blue
Other - Markers, Aqua Painter (for the dirt ground), Word Window Punch, Tangerine Grosgrain Ribbon

THANK YOU!!

I wanted to thank all of you who have posted such warm words congratulating me!! I truly appreciate not only the comments, but the fact that you have taken the time to leave a comment. I love reading each of them and am honored that you check out my blog (definitely makes it all the more worthwhile knowing people are reading it :) ).

This is one of the cards my stamp club made for Sept. I'll post the other 2 cards after this post. I used some new sets and really liked how these turned out.

Supplies:
Stamps - Wild About You!, Paisley
CS - Vintage Violet, Orchid Opulence, WW
Ink - Vintage Violet, Orchid Opulence
Other - Word Window Punch, Vintage Violet Stitched Grosgrain Ribbon, Ticket Corner Punch, Silver Brads
(This card fits in a business size envelope.)

Wednesday, October 04, 2006

SO EXCITED!!

Ok I am really excited!! I just got notification that I am now a part of the Design Team at Scrapping Arts!! YEAH!! If you haven't heard of Scrapping Arts, come check us out over at
www.scrappingarts.com. You won't be sorry! There are awesome scrapbook layouts and a wonderful message board as well.

So, if nothing else - come visit me over there!!! :)


Sorry to be such a bad blogger of late! I've been busy stamping and scrapbooking. I have a few more projects that I need to get completed for a deadline, but I wanted to post some of what I've done.

My daughter has 2 birthday parties coming up, so I made the cards now - WOW! I'm actually on time with it - usually I am rushing 1/2 hour before the party to put something together. I just got this set from my DDSS (Dabbling Demo Secret Sister - Debbie) on SCS. I've wanted this set and have had it on a couple orders only to scratch it during the actual ordering process. Well, Birthday Beauty is ALL mine thanks to Debbie!!! :)

Supply List
Stamp Set - Birthday Beauty
CS - Regal Rose, Bashful Blue, Pale Plum, Old Olive, WW
Ink - Basic Black, Regal Rose, Pale Plum
Other - Prismacolor Pencils, Pink Polka Dotted Ribbon, Blue Polka Dotted Ribbon, Lavender Polka Dotted Ribbon, Olive Organdy Ribbon, Crystal Stickles (on her crown, sash, and shoes), Stampin' Dimensionals (the bouquet was cut out and propped up on a dimensional)